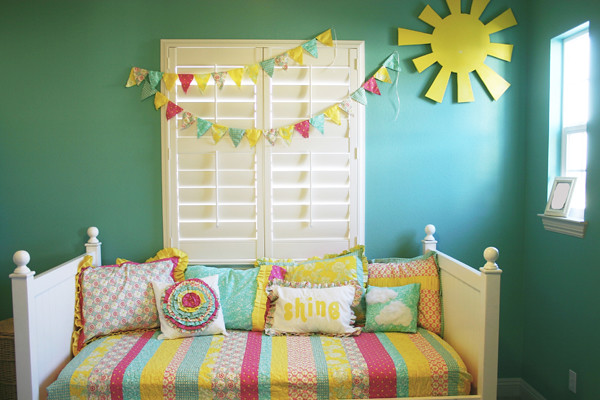
Did you guess that this was me?
This was my entry in the "fabric round" for Crafting With the Stars!
I love love LOVE how it turned out.
Unfortunately it didn't get enough votes to make the top three projects, so the contest is over for me.
This whole thing was really out of my comfort zone and at first very intimidating for me.
But I'm glad I did it and I will proudly take 4th out of hundreds of original entries.
The best part is accomplishing a few big projects.
Jenna wanted her room painted and a new quilt for her birthday (in September), so because of this round, I got it done by November. I'm so, not on the ball. Her only requirement for this room was that she wanted turquoise walls. So I picked some fabric with some turquoise in it. I have been "thinking" (procrastinating) about how I could make this room, bright, fun and a reflection of her.
This bed before... not a reflection of her.
She is blessed to have such a happy disposition and is always optimistic.
Her teacher once told me, "Having Jenna in my class is like having a ray of sunshine in the room."
I have also sung, "you are my sunshine" to her since she was a baby.
So when I found this fabric combination with yellow in it, I knew I had to sneak a little sunshine into her room.
(From top to bottom, the fabrics are: Heather Bailey, Amy Butler, Dena Designs, Free Spirit, Michael Miller, Michael Miller and Dena Designs).
This bed... is much better suited for my sweet girl.
I didn't use any patterns and kinda made it up as I went. I'm working a little more like Kathryn these days, but I will give you some tips and "how to's" starting with the quilt.
Since it's a daybed, I wanted it to be long enough to tuck in on both ends, so I measured how long I wanted it to be. I also knew the length of the fabric would not make it wide enough, so I would need a border. I accounted for this and lined up my strips on the ground. I cut as I went deciding which fabric and width would look best, next. The different strips are 3", 4", 5", and 6" wide. The length of the stripes was as long as the fabric, with the selvedges cut off. I wanted a random look, so I didn't go in a particular order. I did this until it was about 80 inches long.
Then I trimmed up all four sides so they were straight and clean, and added my 8" border.
The quilt top with the border ended up 96" long and 58 " wide.
The back was pieced with 3 large pieces of my favorite fabric out of the bunch.
Then I took it to my mother-in-law's to quilt it. This picture is from my phone, so forgive the quality. If you've never used one of these before, you have to try. It's to fun to hold onto those handles and freehand all over the quilt! Before I had one in the family, I used one at the nearest quilting shop. They would charge $10.00 an hour to use it and help me get it on and off the machine.
Then I did the binding by machine sewing it to the top layer, then slip stitching/invisible stitching it to the back. Hand stitching the binding is the most time consuming part.
I also personalized a message on the border that says, "Jenna, you are my sunshine!"
It's my sentimental touch that I couldn't resist. She loves to look for her name in it.
I intended for it to stay tucked in, but it looks good with the border hanging out too.
All of this new bedding has made her give careful attention to making her bed. She does it very carefully and places the pillows in the same order. I'm sure that will wear off in about 5 minutes.
I don't know if those details help anyone, but I will post some instructions and measurements on the pillows and pennant banner in the next few days.
I have to say that buying fabric is just as fun as using fabric for me!
She always stocks the most current designer fabrics, her selection is endless and the prices are great!
Thank-you to all of you who voted and cheered me on in this little contest.
Especially Kathryn, who I dragged into it, the week of Halloween, making her life crazy!
Cheri, my partner was such an inspiration and a great teacher to me!
Tam and all of the other contestants/stars were so fun to get to know and I'm sure you'll want to keep going back to their blogs for more crafty fun.
Labels: kids' room projects, quilts and pillows
